Github Pages with Tailwind and Vite
- Introduction
- Tailwind and Vite
- Starting the Challenge
- Setup Local Repo
- Getting Ready for Github Pages Deployment
- Setting Up Your GitHub Pages
- Almost There
- Integrating Frontend Mentor Challenge assets
Introduction
I recently decided to do FrontendMentor.io's challenges. Part of the requirement for submitting your solution is to have a Github repo for your code and host your project using GitHub, Vercel, or any hosting service.
I chose to host my initial project with GitHub Pages since I plan to do more challenges. Having my repo and using GitHub Pages to host it keeps my workflow tight. Plus, it is free!
Tailwind and Vite
I love Tailwind. It has been an integral part of my workflow. Vite also helps by streamlining the build process. I created a base template using this killer combo. You can check out the soko repo.
Starting the Challenge
I will be using the Blog Review Card challenge as an example. The nice thing about FrontendMentor.io is that they give you a style guide and the assets you need to complete the challenge. With the assets on hand, I will start the project by deploying my initial setup. This helps me prevent some headaches like broken source links and build failures. Nothing is more irritating than unexpected bugs on your deployed project that didn't exist in your local environment. I find it better to discover these quirks from the start.
You can follow along with me and set up the GitHub Pages from scratch.
Setup Local Repo
Here are the steps to set set up your local repo:
1. Create a directory and go into the directory
mkdir blog-review-card && cd blog-review-card2. When you are inside the blog-review-card directory, run this command:
npm create vite@latest .You will be prompted by ViteJS for options regarding the setup of the
project. For this simple project, select Vanilla and JavaScript.
After providing your options to the prompts, you will see something like this:
✔  Select a framework: Vanilla
✔  Select a variant: JavaScript

Scaffolding project in /home/user/path/to/blog-review-card...

Done. Now run:

  npm install
  npm run dev
The scaffolding will look like this:
 counter.js
 index.html
 javascript.svg
 main.js
 node_modules/
 package-lock.json
 package.json
 postcss.config.js
 public/
 style.css
 .gitignore

2 directories, 10 files
3. Installing Vite Dependencies
npm install
npm run dev
Now that your project's scaffolding has been created and you have the dev server up and running, it's time to install Tailwind.
4. Installing Tailwind
Installing Tailwind is straightforward. Just type the following command in your terminal:
npm install -D tailwindcss postcss autoprefixer
npx tailwindcss init -p
5. Configuring Tailwind
The rest of the steps are from the Tailwind docs:
tailwind.config.js - add paths to all your template files.
/** @type {import('tailwindcss').Config} */
export default {
  content: ["./index.html", "./src/**/*.{js,ts,jsx,tsx}"],
  theme: {
    extend: {},
  },
  plugins: [],
};
styles.css - add the Tailwind directives to your CSS.
@tailwind base;
@tailwind components;
@tailwind utilities;
You can delete all the contents of styles.css and add the Tailwind
directives above.
Optional but highly recommended when playing around with Tailwind--Sorting Classes with Prettier
6. Testing Browser Reload and Setup
You have everything in place. Let's check if everything works as expected.
index.html
<!doctype html>
<html lang="en" class="bg-yellow-300">
  <head>
    ....
  </head>
  <body>
    ....
  </body>
</html>
Just add any Tailwind utility class to the <html> tag, I usually use
bg-yellow-300 for good luck.
Getting Ready for Github Pages Deployment
Before you can deploy the project to Github Pages for free, you need the project to have its own public Github repo. Let's get to it!
1. git init and First Commit
On the root of your project directory, just run the command to initialize git
git initNote: Vite has already created a .gitignore file. Nice.
git add -A
git commit -m 'First commit'
With these commands, you just staged (git add -A) and committed (git commit -m)
your initial setup.
Now that your local repo is ready, you can set the GitHub remote repo.
2. Create a New Github Repository
Log in to your GitHub account and create a public new repo.
Just follow the instructions on GitHub's Create a new repository page, and you're golden.
Note: Copy and paste the section from git remote add origin to git push
3. Pushing Your First Commit
Paste the command you copied from the step above on your command line:
git remote add origin git@github.com:<yourAccount>/fm-blog-review-card.git
git push -u origin main
Setting Up Your GitHub Pages
1. On your newly created repository's page. Click on the settings tab.
The Settings tab is on the right of the tab heading.
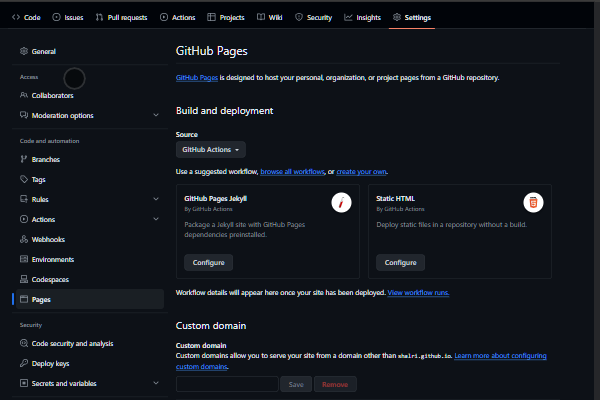
2. Click on Pages
The Pages setting is on the left sidebar, right under the Code and Automation section.
Click on the Static HTML configure button.
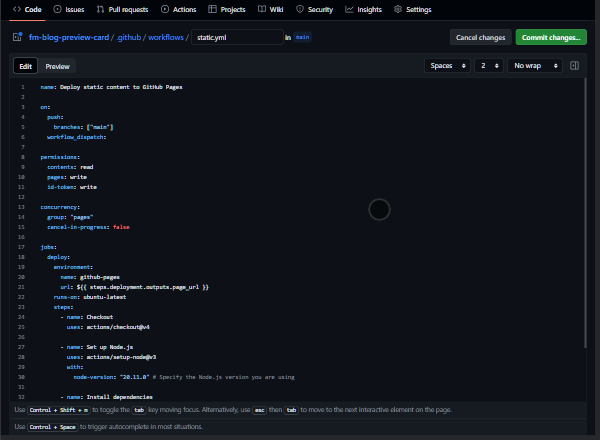
3. Edit static.yml File
Important: Be sure to provide the correct Node.js version you are using. You can check by running this command:
node --versionCopy and paste the code below (edit your node version):
name: Deploy static content to GitHub Pages

on:
  push:
    branches: ["main"]
  workflow_dispatch:

permissions:
  contents: read
  pages: write
  id-token: write

concurrency:
  group: "pages"
  cancel-in-progress: false

jobs:
  deploy:
    environment:
      name: github-pages
      url: ${{ steps.deployment.outputs.page_url }}
    runs-on: ubuntu-latest
    steps:
      - name: Checkout
        uses: actions/checkout@v4

      - name: Set up Node.js
        uses: actions/setup-node@v3
        with:
          node-version: your-node-version # Specify the Node.js version you are using

      - name: Install dependencies
        run: npm ci

      - name: Build static content
        run: npm run build # This command should generate the 'dist' folder

      - name: Setup Pages
        uses: actions/configure-pages@v5

      - name: Upload artifact
        uses: actions/upload-pages-artifact@v3
        with:
          path: "./dist" # Upload the 'dist' folder

      - name: Deploy to GitHub Pages
        id: deployment
        uses: actions/deploy-pages@v4
Click on the commit changes button. It should be on the top right (colored green).
4. Click on the Actions Tab

It should be building and deploying your repo to GitHub Pages. After the deployment, you will be dismayed when you visit the URL. You will probably see a blank screen since we have not configured our base path yet.
5. git pull
Since you made changes in the remote repo, you should pull the changes onto your local repo to keep them in sync.
git pullAlmost There
To fix the 404 errors, just create a config file for Vite and name it vite.config.js.
Copy and paste the following code to your vite.config.js:
import { defineConfig } from "vite";

export default defineConfig({
  base: "/name-of-your-repo/",
});
To be clear, your GitHub Pages URL will look like
https://<user>.github.io/<name-of-your-repo>.
Now you're set. Every time you push a commit from your local repo, Github will automatically update your page.
Integrating Frontend Mentor Challenge assets
Integrating the assets and template files from Frontend Mentor is all you have to do to start coding.
That's it. Your automated workflow is ready.